In July 2002, I had to retire my 1983 GTI which had 345,000 miles on it (almost 100,000 miles further than the moon). I bought the Jetta to replace it, and I can't live without an excellent audio system.
I spent about two months researching, designing and building parts, and installing, and then some occasional maintenance afterward. I published this site for the benefit of others who want to upgrade the factory system. You'll need the ability to fabricate some parts to do it like this. There seem to be a million sites talking about building subwoofer boxes in the trunk, but no one appears to have installed a good overall system, and if they did, it's not in the search engines. I'll try to do a better job with the indexing, and I've included photos and comments that would have helped me a lot if they had been available.
My objective with this installation was to have superior and accurate sound and enough power to overcome the noise you have driving at highway speeds with the windows and roof open. I didn't need to set off car alarms near me, but I also didn't mind if I did.
The car is a 2001 Jetta VR6, 5 speed, with power windows and the upgraded 8-speaker sound system (not Monsoon). It's black black black. I made the dealer give me a Bentley service manual when I bought the car which was very useful. I heard that cars with Monsoon are more difficult to work on, but I don't know. This car has the "A4" frame (adopted in 1999), so if you are installing into an older Jetta with an A3 frame, you might experience some differences. I'm not familiar with those. This manual says it's for the 1999-2002 Jetta, Golf, and GTI (2.0L Gasoline, 1.9L TDI diesel, 2.8L VR6, and 1.8L Turbo).
What was installed
Speakers
I installed a CDT Audio MS-100 "minibox" subwoofer in (more accurately: through) the rear deck. This sub is rated 150W RMS (recommended to be driven with 50-150W) and like most subs requires an enclosure of a specific volume (recommended and maximum volume is 0.90 cubic feet; minimum volume 0.45 cubic feet). The shape and dimensions don't matter as long as it's airtight, the volume requirement is met, and the shape is not radical. I paid $269 for this speaker, but it was on closeout for $99 in November 2003 (after I bought mine). Maybe that happens at the end of the year. The mounting depth is 4". Frequency response: 25Hz - 500Hz.
I installed (in the front doors) a set of CDT Audio High Definition Component speakers HD-642DT, which is a 3-piece component set (6.5" woofer, 4" midrange driver, and 1" silk tweeter which was an upgrade option over the standard 1") that handles 150W/ch RMS and features a 50Hz - 20KHz frequency response. I am very pleased with them. There are two crossovers for each channel. They have a 3-year warranty if you mail back the registration card, which I did. I purchased these 4-ohm speakers for $610 from theZEB, which I highly recommend. I had an exceptionally good experience with my online order, the prices (they really do honor the price match policy), and in particular the customer service was extraordinary. They answered all of my questions promptly and accurately by email. Here is an excerpt with a ZEB support technician that discussed the tweeter options and which convinced me to get the "deluxe silk tweeter" and answered some of my other questions at the same time:
There is a noticeable difference between the regular 1" tweeter and the deluxe 1" tweeter. This difference was even more noticeable last year when the regular HD model had a 3/4" tweeter. Now for 2002, the regular HD model has been upgraded to a 1", which narrow the gap between the two offerings.
The DT upgrade has a tweeter that has been worked over more with better internals, etc. Is it worth the $70 extra bucks? -for me it would be I suppose, however I can confidently say to you that you will be 100% pleased when listening to either version of the HD components. I would say that there is *not* a huge 'night-and-day' difference between the two.
...
The DT is the deluxe silk-dome tweeter. The DTM is the deluxe metal-dome tweeter. Generally speaking, silk domes yield a smoother sound. Metal domes generally are going to be sharper, crisper (for those that like the sound). For those that don't like how they sound, you would describe them as being harsh and perhaps fatiguing. Younger guys tend to go for metal domes... silks for a more accurate, mature taste. Now, looking at the HD components; CDT has spent a lot more time perfecting the silk dome (in my opinion). Their silk dome is much more dynamic than their metal dome. I have found that even the teenagers that think a component set is all about having bright ringing highs prefer CDT's silk domes over their metal -they seem to do everything better. CDT is definitely the brand to consider, even looking at the brands we don't list/promote online. You can duplicate CDT's level of sound, but definitely not for their price range.
...
I would say the most involved, but the best location would be to mount the sub(s) in the rear deck. This would do a better job of getting the bass into the cabin as there are no barriers. The difficulty in doing this is enclosing the subwoofer. Depending on how your trunk is shaped, you may need to rig up some stilts on the box to suspend the enclosure in place.
...
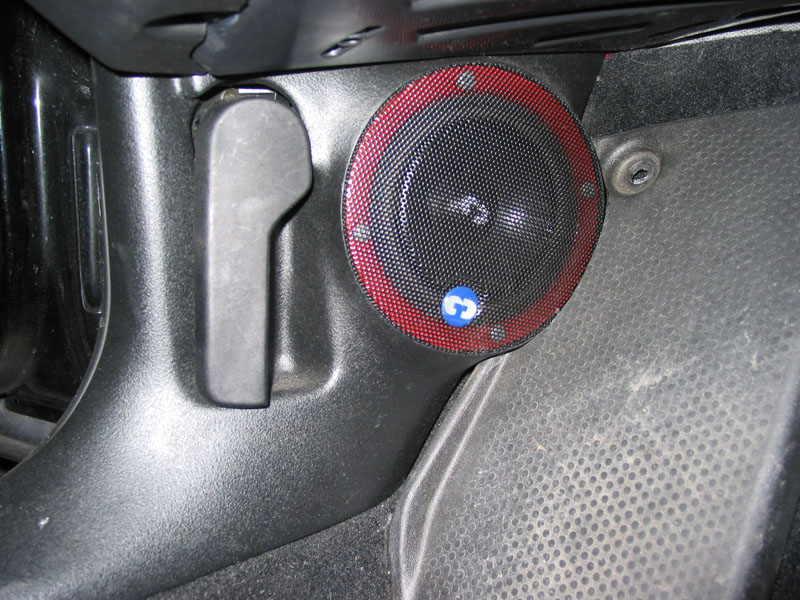
The most expensive and difficult part (if I had chosen to do it) of my speaker installation (excluding the fabrication of parts) was mounting the 4" midrange drivers. The doors had a 6.5" woofer in the lower door behind a speaker grill (attached to the door panel) and a small tweeter mounted in a triangular shaped plastic housing at the top front of the door. I used these factory locations but unless you are installing a 2-piece component set, you have to do something with the midrange drivers. I considered mounting them in the doors, but it would have been difficult, less attractive, and facing in a bad direction so the sound quality would have been notably worse than mounting them in the "kick panels," just below the dash at the extreme left and right sides of the car. The kick panel is called the "A-Pillar Lower Trim" in the service manual. I'm not good at that sort of work, so I hired a local professional installer, Autosound Car Audio & Security (1285A Manheim Pike, Lancaster PA), which charged a reasonable price of $275.00 to modify the factory trim to accommodate the drivers. This firm was very helpful and knowledgeable; they've received a lot of awards for competition work, and they textured and dyed the new fiberglass work to match the original, which impressed me. Their prices for other parts were consistently too high so I ordered online, and like most autosound installers they tended to be slightly annoying (at times) to talk to, but they did an exceptional job on the custom kick panels. I had to leave the car there for three days, and the panels were not ready for four days after that, but they looked like factory originals – an extraordinary job that really pleased me. Another firm wanted $500 and said it wasn't possible to match the original, and another wanted $5000 to mount the subwoofer the way I wanted (which was not in a box sealed in the trunk!) and they wouldn't even return my calls. All four firms I talked to were slightly to very annoying in some way; maybe it's just me but all the autosound installers I've ever talked to have rubbed me the wrong way at least once and I'm not sure why.
Here is a photograph of the left 4" midrange mounted in the modified kick panel. It's a little dirty because I took the picture in the winter:
Autosound also removed my factory stereo because I didn't have the special
tool (VW 3316) required to remove it. Note that if you do not have the radio
code, you will not be able to use it again or resell it.
Electronics
In the dash, I installed a JVC KD-SX950 CD player (which I purchased because of its features, appearance, reasonable price, and the rotary volume control knob), and a Pioneer DEQ-7600 15-band equalizer/DSP (which I also purchased from ZEB although etronics had a lower price – which ZEB matched). The units are both DIN height. I replaced the factory stereo and the empty hole below the retractable cup holder. The CD player was installed in the lower hole so it wouldn't interfere with the cup holder when it was deployed. Autosound recommended against this because of possible heat considerations, but I haven't had any trouble.
Getting the metal "cages" into the dash was quite annoying at first (they did not just "fit" as expected), but as it turned out I was not forcing them in hard enough. I had trouble fitting all the wiring behind the units and had to push it from the front and pull on the wires from the back to get them to snap into the place in the dash, and that is even after I cut plastic inside the dashboard. I hassled for way too long trying to stuff in all that wiring before I gave up and started cutting (more on this in the installation section). See also, wiring problems (below).
I haven't been using the sound field controls on the equalizer, but I do use some equalization to compensate for road noise and personal preference. I'm very pleased with the equalizer and the system in general. I have no noise or interference at all, and even at very high volume, the system is totally silent even with the car running. This is a big upgrade from the annoying engine noise and whistling I had in the older car.
On a plywood platform affixed with screws to the back of the right rear seat, I installed a new 2-channel amplifier, Ultimate Sound TA-2600 (180W/ch RMS at 0.03% THD all channels driven) that I selected based on its specs, price, and a recommendation from ZEB. I would never buy an amp with more than 0.05% THD at the full rated power, although I understand that you can't detect (hear) anything less than 0.1%. The dimensions of this amplifier are 15.75" x 9.75" x 2.25" and it has fuses mounted directly on it.
I intended to recycle an old power amp from my GTI, but when I removed it from service (working) and reinstalled it in the Jetta, it was no longer working. Just my luck. I replaced it with a U.S. Acoustics USX2080 ($85 from ZEB) configured to bridged mode to drive one four ohm load. This amplifier is fairly small and has slightly more power than the MS-100's recommendation (50-150 W RMS). I considered a Class D amplifier, but Autosound said if I am going for quality (which I was), Class AB is preferred because the digital ones can clip or cut out easier. I took their word for it. Class D amplifiers are more expensive anyway. The dimensions of this amplifier are 8" x 9.75" x 2.5".
The four crossovers, power distribution connections, and both amplifiers are mounted on this panel.
Wiring
I wanted to order all of my wiring from the same place, but I never found one dealer that carried everything I needed, so I split the order among two firms who had good prices and carried everything. There are a lot of choices for wiring kits, but here are my parts suppliers and orders:
from Car Stereo Mall
Impulse
IAK-2000 Red 4 Gauge 2-Channel Amplifier Kit (imp-iak2000) $49.99
from my local Home Depot
a few feet of red and a few feet of black 8-gauge stranded copper wire for the
short power wire runs from the distribution blocks to the amplifiers and for
the subwoofer signal connections inside the enclosure.
from my local Radio Shack
a very short connector cable: female mono RCA jack to two male RCA plugs to
feed both inputs of the subwoofer amplifer with one signal.
from Autosound (the only place I could find it):
one spare 80 amp fuse for the system power at the car battery (in addition to
the one in the wiring kit)
from SoundDomain.com
total order $124.50
qty 2 item #LITBD1: Lightning Audio Bolt BD1 Distribution Block (for amplifer
power and ground)
qty 1 item #SCOVWA2B: Scosche VWA2 Antenna Adapter
qty 1 item #LITLST12SPOOL50: Lightning Audio Strike LST12-50 Speaker Wire (12
gauge, for woofers)
As noted in the running text, I would not use 12 gauge wire if I were doing
this again.
qty 1 item #SCOVW01B: Scosche VW01 Car Stereo Wiring Harness
qty 1 item #LITBAGU1: Lightning Audio Bolt BAGU1 Fuse Holder
qty 1 item #LITMXR15SPOOL50: Lightning Audio Storm MXR15-50 Speaker Wire (15 gauge flat, for tweeter)
qty 1 item #LITSAGU30: Lightning Audio SAGU30 Fuse (for subwoofer amplifier)
I also ordered the following RCA interconnect cable from them:
qty 1 Lightning Audio Strike LSIX 4 Interconnect Signal Cable
They didn't stock this four channel cable, but they were able to substitute
two stereo RCA interconnect cables (part #LITLSIX25 and LITLSIX5) in place of
it. The price of these and the 3-day shipping is included in the $124.50 order
total.
My worst wiring problems were:
1. I couldn't get the car trim (sill trim) back on properly because there was so much wire under the carpet. I had to trim away parts of the carpet fiber backing to accommodate the extra thickness. If I did this again, I would probably use 14-gauge wire instead of 12, and try to get at least one of the RCA cables under the car frame instead of above it. I should have run the RCA cables first, but I ran the speaker wires first (hence, I could not get any of the plugs under the car frame). I actually broke part of the sill trim by pressing down too hard when trying to get the clips to engage the car frame along the right front door. It can't be repaired (I tried several times to epoxy it and it always breaks immediately on installation) and I ended up removing some of the fiber "board" under the carpet anyway.
2. Somehow, a short circuit to chassis ground developed in the right midrange speaker wiring. This was located inside the trunk area, below the parcel shelf. I had to tear everything out to permanently fix it (although moving the wire fixed it and isolated the problem). The symptom of this problem was that after working properly for three weeks, one day the system and all speakers worked when set to very quiet level, but as soon as you turned it up, the amplifier Protect light came and the protection circuit shut the sound off. I thought I had a bad component and it took several hours of debugging and swapping parts across channels before I thought to measure for this fault (which showed up easily with a good meter once it occurred to me what might be happening). Some of the metal on the car must be sharp up in there and cut through the insulation, or else some of the insulation on the wire was faulty.
3. A similar problem (front door 6.5" woofer positive terminal shorted to ground) occurred when my door window came out of its track and fell down into the door after I tried to operate it in the winter (I guess it was frozen shut). The window either pulled on the wires or hit the terminals, and bent one of them so it contacted the door frame (at the round hole behind the 6.5" speaker. I had to disassemble the door to fix this (which I've done about 30 times now!), and I prevented it from happening again by covering both speaker terminals with tape. The symptom of this problem was a horrible full-volume, low frequency rumble blasting out of all the front speakers anytime the system was on and set to nonzero volume. I'm rather surprised it didn't damage anything. I confirmed the short by disconnecting the crossovers from the amplifer, and measuring the resistances of each of the six speaker terminals to ground. The speaker wire with the short was reading 1.5 ohms to ground, while all the rest were infinite. The readings were not conclusive if the crossover was connected to the amp, although the unshorted ones were all 5.6 ohms or more when connected.
4. When I finally managed to squeeze all the wiring behind the head units, some of the RCA connectors that run the line outs to the amplifiers pulled loose. I had to remove both head units and do it again. The second time I taped them connected!
5. Minor irritations:
• when it is extremely cold (overnight), the system has a buzz or squeal
when it first comes on. This quickly goes away (in about one minute) after it
warms up. I don't know where it originates, although I suspect the equalizer.
My equalizer actually failed (6 months out of the one year warranty), developing
a severe engine noise (whistle) out of its front output, which leads me to believe
it has two independent regulated power supply sections (one not working). Diagnosing
that was more than a minor irritation.
• when you start the car with the system on and playing, the voltage drops
enough that the head unit resets. It has power-on resume, so it isn't a problem
other than the sound interruption.
• the thicker speaker wires don't fit into the crossover terminals because
the terminals are too small and sort of suck. I trimmed away strands of the
wires until they fit in, but they're still the weakest part of the CDT front
speaker system.
How it was installed
Front Speaker Mounting
I had to make two each of three parts:
a tweeter mounting ring to attach the tweeter to the modified factory
tweeter housing. This ring protects the face of the tweeter from contact with
the factory tweeter housing, and allows me to replace the tweeters easily if
they ever burn out. The ring is epoxied in position.
a woofer speaker mount that is attached to the door with screws, on which
the 6.5" speaker (woofer) is mounted, and
a woofer cover/adapter that goes over the 6.5" speaker and holds
the rubber sound guide (the factory part). Autosound said that rubber sound
guide that was used in the factory speaker system was very important and that
I needed to find a way to attach it, although when I compared having it installed
and not installed, I couldn't hear an obvious difference. I installed it anyway.
The sizes (depths) of the parts I made were chosen to locate this rubber sound
guide in the same position and protruding the same distance from the door as
in the factory original installation. The sound guide has a flexible rubber
end, so there is about 0.25" tolerance or so on the depth.
I advise making the parts before you begin the installation. Also, fill up the gas tank before you remove the left door panel, because you can't open an electric filler cap with the switches disconnected! I didn't remember to do this, so when I needed gas, I was holding the door panel, fumbling with a connector, and trying to push the gas cap release button — in the pouring rain.
For detailed plans, fabrication drawings, instructions, and photos of the parts and assembly, see the Speaker Installation Details Page.
The actual diameters of the speakers varied slightly from the printed specifications, so I recommend having them in your possession before drilling any holes or making parts. Unfortunately, no templates are available on the CDT website, nor are they included in the package. I had to make my own templates. Neither standard AMP terminals nor the ones in the amp kit fit the speaker terminals either, until they were pinched more closed with pliers. There must be some standard terminals that fit them, but I apparently didn't have any nor do I know where to get them, and they fell off the 6.5", so I ended up soldering them on.
I made a thin foam gasket for between the door and the mount, and between the speaker and the mount. This was made from a thin sheet of black foam (available at a craft supply store such as Michaels or A.C. Moore). I traced it with a compass, cut it with a razor knife and scissors, and then used a regular paper punch to put four screw clearance holes in it after marking the locations using the woofer itself as a template.
Subwoofer Mounting
I mounted one 10" subwoofer exactly in the middle of the rear deck, cutting through the parcel shelf and the roof of the trunk. Since it's necessary to have an airtight seal between the subwoofer speaker and the enclosure, you must be able to fabricate parts to do this. It is not trivial. The advantage of all that extra work is in sound quality, visual appearance, and the enclosure taking up space on only the ceiling of the trunk. I keep cars a long time (my last one for 14 years / 345,000 miles) so I didn't mind doing this permanent modification. I won't be selling it.
I chose to only mount one in the center because of my listening preferences and because the curvature of the parcel shelf could only accommodate a 10" speaker (laying approximately flat) in the center. The integrity of the car body is probably better, and the size of the subwoofer enclosure in the trunk is also reduced with only one.
One person I know suggested another approach would have been to mount the sub in a box inside the trunk, and make a non-airtight sound guide going up and through the rear deck, which would be covered by a speaker grille. I chose to have the speaker visible and I think my approach used up less trunk space.
When I originally made the enclosure, I didn't realize that the Lexan the box was made of was not nearly rigid enough. It vibrated (buzzed) so badly when the subwoofer was driven hard that I disassembled the whole thing, removed it, and modified it with rigid aluminum reinforcements. In retrospect I may have chosen to make it from much thicker rigid plastic or wood, but I didn't know until I was done that there would be a problem.
I had to make one piece of each of three parts:
a subwoofer mounting wedge that was located between the parcel shelf
and the subwoofer enclosure mount. This was constructed of PVC plastic. The
trunk ceiling metal was cut away and this makes an airtight seal with the subwoofer
enclosure mount.
a subwoofer enclosure mount that was bolted the roof of the inside of
the trunk and to which the enclosure was fastened. This was constructed of wood.
the subwoofer enclosure with a volume of 0.9 cubic feet.
To deter theft, I used security screws that take a special driver bit to secure the speaker to the mounting wedge, so thieves could only destroy it, yet not remove it with a regular screwdriver. There are a variety of designs for such screws.
For detailed plans, fabrication drawings, instructions, and photos of the parts and assembly, see the Subwoofer Installation Details Page.
Amplifier Mounting
I mounted the amplifiers and electronics on a 3/4" thick plywood platform that I sanded smooth and painted black.
If you mount an amp vertically, it is best to mount the amp so that its heat sinks are vertical (flowing up to down, not left to right) for best heat dissipation.
For information and images, see the Amplifier Installation Details Page.
Fold down the rear seat, securely hold the plywood in position, and carefully
drill four or six holes through it, though the carpet, and through the metal
plate that is the back of the seat. I did this on the right side of the
car because that seat back is larger than the other one. Don't drill the holes
too large - they should be smaller than the screws. Don't drill so deep that
you damage the rear seats!
Test that the holes are the correct size for the screws by putting the screws
in the holes before the plywood is affixed. They should screw in securely, but
not too tightly. I had to experiment with the sizes and redrill the holes a
few times because I first made them too small, and the seat back metal is so
hard, I broke two screws off. They shouldn't have to be forced, but they should
not strip out.
With the plywood out of the car, drill clearance holes in the plywood so the
screws slip through, then use self-tapping metal screws through the plywood
and into the holes in the seat to secure the plywood to the back of the seat.
The equipment is then screwed into the plywood mount where it fits, and trying to pay attention to the rule that signal wires and power wires should be kept at a distance when possible. Use screws with a length that goes deep into the plywood, but not through it.
For a ground connection, I drilled through the trunk ceiling at a place I could get a bolt and nut through, and which I could grind away the paint to get a good ground. The gold terminal with the two set screws from the amplifier wiring kit is at the car end of the 4-gauge ground cable.
For detailed information and views of the amplifier and wiring, see the Amplifier and Wiring Details Page
Wiring
I ran the 4-gauge (+) power wiring along the left side of the car and all the signal wiring (line level and speaker level) along the right side. It's concealed below the sill trim. I put the six speaker wires (three pairs) under the plate to the right of the right front seat (where there was some factory wiring) - this was a tight squeeze. There was no way the line level interconnects would fit there, so they're above it, concealed by the sill trim. Removing all the trim that was necessary to do this job was a pain in the ass. See Wiring Details for images and "how to". The + power wire was run together with the factory wires, inside the metal channel on the left side. Be careful that it's moved out of the way and on the same side before reinstalling the clips for the sill trim.
I paid Autosound $35 to drill a hole in my firewall for the + power wire and to run it through there protected by a hard plastic grommet (I refused to use a rubber one, as did they). There is a spot near the middle of firewall where you could run a wire (it's a pre-cut piece and a heat shield), but I wanted it on the left side of the car since I was short of wire (20 feet is barely sufficient) and wanted to avoid the hot areas behind the engine. They drilled the hole next to the master cylinder (see image on Amplifier and Wiring Details Page), and I ran it to the fuse holder which I mounted on top of the plastic battery case with two stainless steel screws and nuts. I was happy to pay $35 to not take the chance of drilling through something important.
Make sure the wiring isn't in contact with anything sharp or moving (such as the pedals). Any place where it might touch something, you can wrap it with the ribbed wire protector sleeve that comes with the amplifier installation kits and tape or cable-tie it on. Generally, if the factory wiring uses it, so should the audio wiring.
Be sure to use the correct Allen wrench on the power distribution blocks and fuse holders. They have to be tightened securely, and I was surprised to find they were metric (mostly 3mm). If you use the wrong size, it will strip out the hex head when tightening them down.
=========
Links for detail pages and illustrations:
Front Speaker Installation Details
Subwoofer Installation Details
Amplifier and Wiring Installation Details
For Troubleshooting information, re-read the running text and as a last resort you can email me at [email protected]
I am the owner and technical administrator of the Official Blondie Web Site (http://blondie.net).